|
|
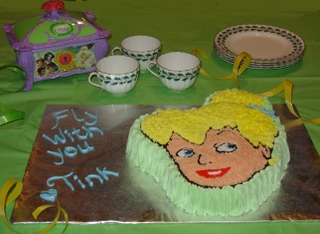
Tinker Bell Cake
You Can Make
Pin It
One of the easiest ways to make a Tinker Bell cake is to use a character cake pan and a star tip. Even beginners will find success with this method.
Supplies needed:- Tinker Bell cake pan
- Cake mix (one layer)
- Cake board
- Foil wrap (optional, but it looks great)
- Cake turntable or small lazy Susan (optional, but really useful)
- Wilton decorating tips #3 and #16 (#21 optional if you want to add a bigger shell border) and couplers for the tips
- Disposable decorating bags (easiest) or parchments (cheapest)
- 5 to 5 ½ cups of buttercream icing
- Icing colors blue, yellow, red, copper (or skin tone), green and black
- Small amount of cornstarch
Directions:
- Generously grease the Tinker Bell cake pan with shortening. Pay special attention to all the grooves and indentations of the pan. Lightly flour to dust and shake out excess. Do not underestimate the importance of this step. If the pan is not well-greased, the cake may stick, either ruining the facial outline or causing difficulties when you try to repair the damage.
- Mix and bake your favorite cake recipe or prepare cake mix according to package instructions.
- When the cake is done cool in pan on a wire rack for about 10 minutes. Then gently turn pan over and remove the cake. Let cool completely on a wire rack.
- When the cake is cool, turn it face down onto a flat surface. Tinker Bell’s face should be face down. With a sharp knife cut the “belly” of the cake off in a sawing motion. This will allow the cake to lie flat on the cake board. Immediately turn the cake back over.

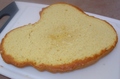
Another option is to try to cut the “belly” off while the cake is still in the pan. The advantage is that Tink is never face down. However, it is sometimes difficult to cut evenly when the cake is in the pan. I would recommend taking the cake out of the pan before completing this step. If you turn the cake back over immediately when you are finished, Tink's face will not be squished.
- Prepare the cake board. If you want the board to be in the shape of the cake, trace the cake pan on the cake board, leaving about 2 inches around the edge and cut with an exacto knife. Another option (as pictured), is to use a rectangular board that is larger than the pan. With this option you can write a message next to the cake. Cover the board in foil wrap. Measure the foil wrap leaving an inch all around.
- Place the cake on a wire rack. Place the wire rack on a cookie sheet.
- Make a thin glaze to lightly cover the entire cake. This will keep the cake from drying out and will make it taste better.
Tip: Take a tub of any ready-made frosting and microwave for 15-20 seconds. Stir. The frosting should be in liquid form. Pour onto the cake and move and tilt the cake so the frosting spreads and covers the entire surface. Let the frosting harden again for about 15 minutes before decorating.


- Prepare the buttercream frosting. Tint the colors according to the directions contained with the cake pan.
- When the frosting is dry, place the cake on the cake board. You may put a little frosting on the bottom of the cake to secure it in place. Now the decorating begins.
- Always begin with the eyes. Outline the eyes in black with tip #3. Fill in the white of the eye, followed by the blue iris. Then add the black pupil. If it is not smooth, dip your finger in some cornstarch and gently smooth down.
- Next, outline the lips in red with tip #3. Fill in the red lips. Fill in the mouth white with tip #3. Dip your finger in some cornstarch to smooth.
- Next, outline all of the features in black with tip #3.
- Begin filling in the face with skin tone icing and tip #16. Practice first on a plate or piece of foil before beginning. Hold the bag at a 90 degree angle. Squeeze until a star appears and then stop applying pressure. When you feel comfortable, begin on the face. Start around the eyes and work your way out. The stars should be so close together that you do not see the cake underneath.
- Next, use tip #16 and yellow icing to fill in the hair.
- Finally, use tip #3 to make the blue ribbon in Tinker Bell’s hair.

- Tinker Bell’s face should be complete. It is now time for the finishing touches. Using tip #16 and any coordinating color of icing you wish (green is pictured), squeeze the frosting out going up and down the sides of the Tinker Bell cake. This creates a ribbed look and really finishes out the appearance.
- If you have cut the board to fit the cake, I would recommend using tip #16 or #21 to make a shell border.
- Finally, if you have a large cake board, add whatever message you choose using tip #3 and any coordinating frosting color you wish.
Congratulations, your Tinker Bell cake is ready to go. This is one of the easiest ways to make a Tinker Bell cake, but it looks fabulous. There are also many other easy
Princess cake
ideas you can take a look at to get more ideas.
Go From Easy Tinker Bell Cake
to Tinker Bell Birthday Party
Go from Easy Tinker Bell Cake
to Pretty Princess Party Ideas Home
|
|
|


